
ConstraintLayout Layer는 여러 View에 같은 변형을 한 번에 적용하고 싶을 때 쓰는 helper입니다. 아이콘과 텍스트를 함께 이동하거나, 여러 View를 하나의 묶음처럼 회전·확대해야 할 때 검토할 수 있습니다.
다만 Layer는 ViewGroup이 아닙니다. View를 안에 담는 컨테이너가 아니라, 이미 ConstraintLayout 안에 있는 View들을 constraint_referenced_ids로 참조해서 변형을 적용하는 방식입니다.
ConstraintLayout Layer 핵심 정리
- Layer는 여러 참조 View에 transformation을 함께 적용하는 ConstraintHelper입니다.
- 참조할 View는
app:constraint_referenced_ids에 적습니다. translationX,translationY로 묶음을 이동할 수 있습니다.rotation으로 참조 View 묶음을 공통 중심 기준으로 회전할 수 있습니다.scaleX,scaleY로 묶음 전체를 확대하거나 축소할 수 있습니다.- 단순히 여러 View를 숨기고 보이게 하는 목적이면 Layer보다 Group이 더 직접적입니다.
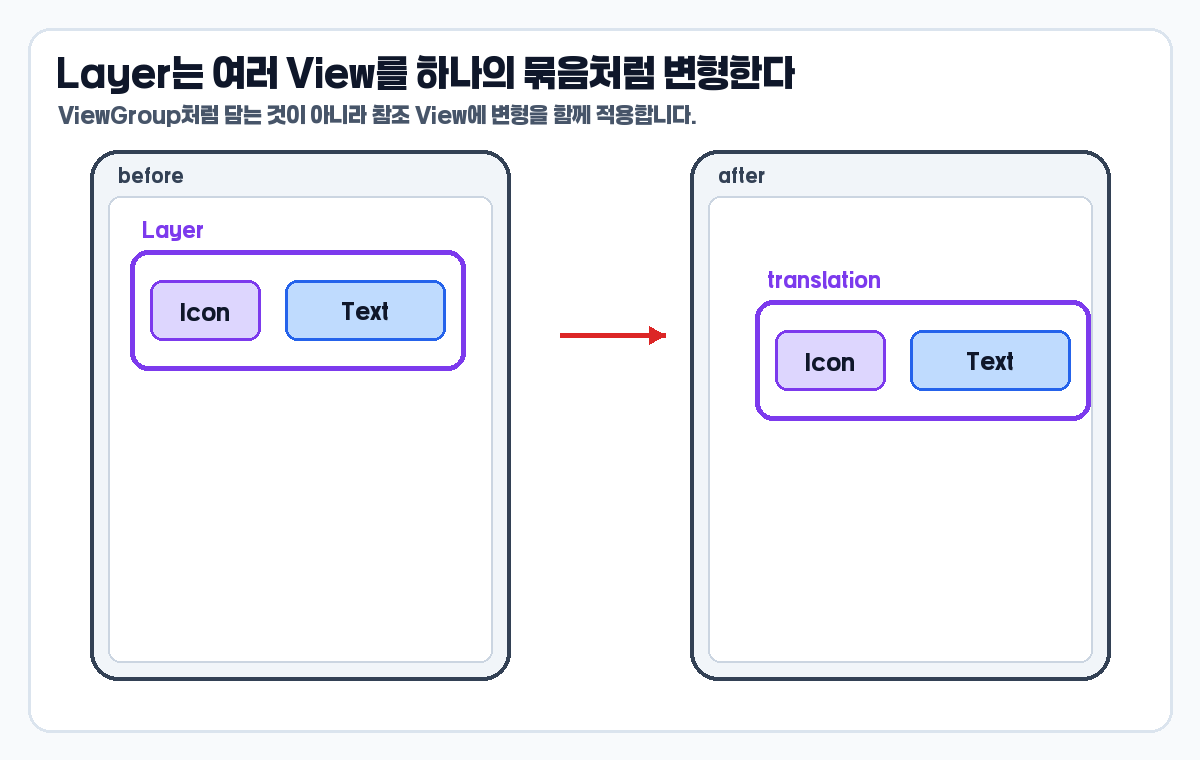
post-layout 변형으로 이해해야 한다

Layer의 translation, rotation, scale은 원래 constraint를 없애고 새 배치를 만드는 기능이 아닙니다. 먼저 각 View가 자신의 constraint에 따라 배치되고, 그 다음 Layer가 참조 View 묶음에 보이는 변형을 더한다고 보는 편이 정확합니다.
이 차이를 놓치면 디버깅이 어려워집니다. View가 원래 잘못 배치된 것인지, Layer가 적용된 뒤 보이는 위치만 바뀐 것인지 먼저 분리해야 합니다.
Layer는 ViewGroup이 아니다

Layer를 처음 볼 때 가장 헷갈리는 지점은 이름입니다. Layer라는 이름 때문에 안에 View를 담는 박스처럼 느껴질 수 있지만, 실제로는 ConstraintHelper 계열입니다.
공식 ConstraintHelper 문서는 helper가 여러 widget을 id 목록으로 참조한다고 설명합니다. 그래서 Layer의 기본 사용법도 참조할 View id를 적고, 그 View들의 배치가 끝난 뒤 변형을 더하는 흐름으로 이해하면 됩니다.
<androidx.constraintlayout.helper.widget.Layer
    android:id="@+id/profileLayer"
    android:layout_width="wrap_content"
    android:layout_height="wrap_content"
app:constraint_referenced_ids="profileIcon,profileName" />여기서 profileIcon과 profileName은 Layer 안에 들어가는 child가 아닙니다. 둘은 ConstraintLayout 안에 따로 선언되어 있고, Layer가 id로 참조할 뿐입니다.
translation으로 여러 View 함께 이동하기

아이콘과 텍스트를 함께 살짝 옮기고 싶다고 가정해 보겠습니다. 각 View에 translation 값을 따로 주면 값이 조금만 달라도 묶음 간격이 어색해질 수 있습니다.
이럴 때 Layer에 translation을 적용하면 참조된 View들이 같은 방향으로 함께 이동합니다. 원래 constraint 관계는 유지하면서 화면에 보이는 위치만 묶음처럼 옮기는 셈입니다.
<androidx.constraintlayout.helper.widget.Layer
    android:id="@+id/titleLayer"
    android:layout_width="wrap_content"
    android:layout_height="wrap_content"
    android:translationX="12dp"
    android:translationY="4dp"
app:constraint_referenced_ids="titleIcon,titleText" />이 방식은 배치 자체를 다시 설계해야 하는 문제와, 화면상으로 살짝 움직이는 문제를 구분할 때 유용합니다. 위치 관계를 바꾸는 것이 목적이면 constraint를 바꾸고, 묶음 표시 위치만 옮기는 것이 목적이면 Layer를 검토합니다.
rotation은 공통 중심을 기준으로 본다

Layer 레퍼런스는 setRotation(float)이 연결된 모든 View를 하나의 공통 지점 기준으로 회전시킨다고 설명합니다. 그래서 회전 결과를 볼 때는 개별 View 하나가 아니라 참조 View 전체의 묶음 박스를 먼저 생각해야 합니다.
<androidx.constraintlayout.helper.widget.Layer
    android:id="@+id/badgeLayer"
    android:layout_width="wrap_content"
    android:layout_height="wrap_content"
    android:rotation="12"
app:constraint_referenced_ids="badgeIcon,badgeText" />작은 badge나 강조 라벨처럼 여러 View를 한 덩어리처럼 살짝 기울여 보여줄 때 이런 구조를 검토할 수 있습니다. 하지만 애니메이션 전환 자체가 목적이라면 이 시리즈 범위를 넘어 MotionLayout이나 별도 상태 전환 설계를 함께 봐야 합니다.
scaleX와 scaleY로 묶음 크기 바꾸기
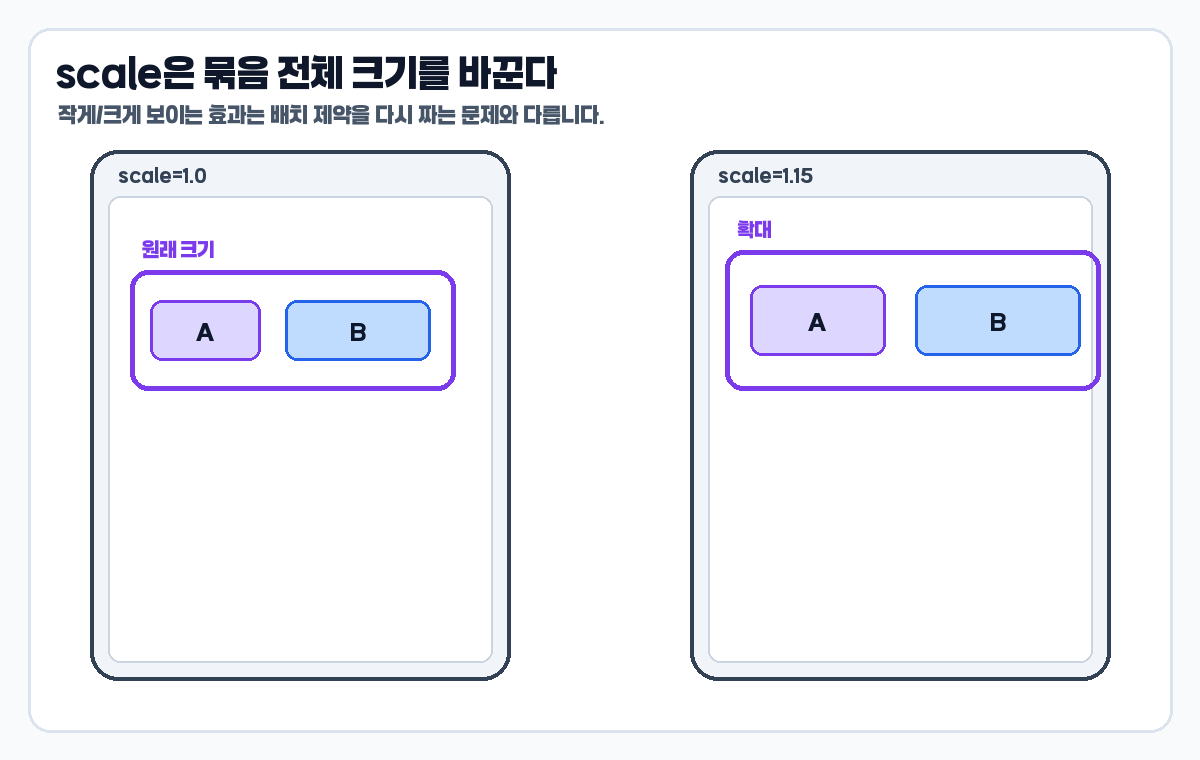
scaleX와 scaleY는 참조 View 묶음을 공통 기준으로 확대하거나 축소할 때 사용합니다. 버튼 안의 아이콘과 텍스트, 카드 안의 강조 요소처럼 함께 커져야 자연스러운 묶음에 적합합니다.
<androidx.constraintlayout.helper.widget.Layer
    android:id="@+id/ctaLayer"
    android:layout_width="wrap_content"
    android:layout_height="wrap_content"
    android:scaleX="1.08"
    android:scaleY="1.08"
app:constraint_referenced_ids="ctaIcon,ctaLabel" />다만 scale은 실제 constraint를 다시 계산해서 공간을 확보하는 기능이 아닙니다. 확대된 결과가 주변 View와 겹칠 수 있으므로, 주변 여백과 터치 영역은 Preview에서 따로 확인해야 합니다.
pivot 기준을 확인해야 하는 이유
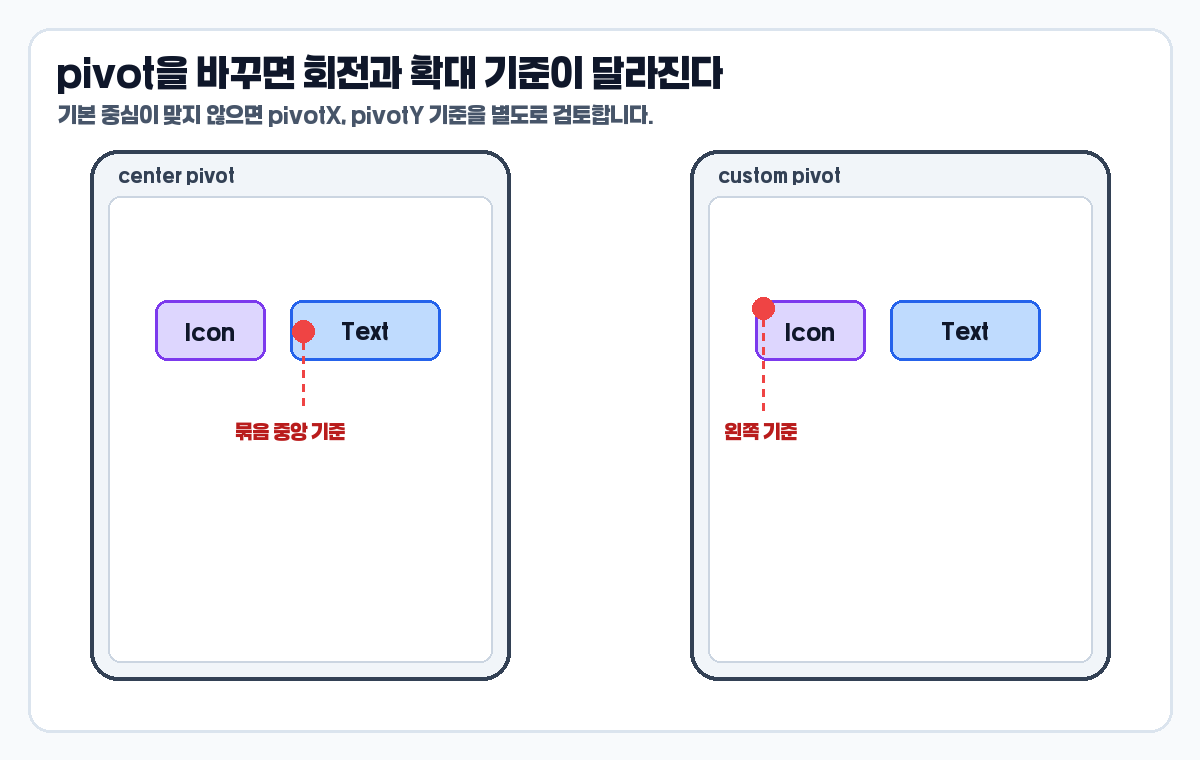
회전이나 확대가 기대한 위치를 기준으로 일어나지 않는다면 pivot을 확인해야 합니다. Layer는 공통 중심을 계산해 변형을 적용하지만, 화면 의도에 따라 왼쪽, 오른쪽, 특정 지점을 기준으로 삼고 싶을 수 있습니다.
<androidx.constraintlayout.helper.widget.Layer
    android:id="@+id/menuLayer"
    android:layout_width="wrap_content"
    android:layout_height="wrap_content"
    android:transformPivotX="0dp"
    android:transformPivotY="0dp"
    android:rotation="-8"
app:constraint_referenced_ids="menuIcon,menuText" />XML에서는 View의 pivot 속성을 android:transformPivotX, android:transformPivotY로 지정합니다. pivot은 위치를 바꾸는 속성이 아니라 변형의 기준점을 바꾸는 속성입니다. 따라서 pivot을 조정할 때도 원래 constraint가 먼저 정상인지 확인한 뒤 보는 편이 안전합니다.
Layer와 Group은 이렇게 나눈다

14편에서 다룬 Group과 Layer는 모두 ConstraintHelper 계열로 볼 수 있지만, 목적이 다릅니다. 여러 View를 한 번에 숨기거나 보이게 하는 목적이면 Group이 더 단순합니다. 반대로 이동, 회전, 확대처럼 transformation이 필요하면 Layer를 검토합니다.
- Group: 여러 View의 visibility를 함께 제어한다.
- Layer: 여러 View의 translation, rotation, scale 같은 변형을 함께 적용한다.
- 두 helper 모두 ViewGroup처럼 child를 담는 컨테이너로 이해하면 안 된다.
Layer가 어울리는 실전 상황
- 아이콘과 텍스트를 하나의 badge처럼 함께 이동해야 한다.
- 여러 View로 만든 강조 라벨을 살짝 회전해 보여줘야 한다.
- CTA 영역의 아이콘과 라벨을 함께 확대해야 한다.
- 상태 변화에 따라 여러 View의 표시 위치만 살짝 보정해야 한다.
- 참조 View 묶음의 visibility만 바꾸려는 목적이라면 Group을 먼저 검토한다.
Layer는 여러 View를 묶어 보이게 만드는 도구이지만, 복잡한 화면 구조를 감추는 만능 해결책은 아닙니다. 배치 구조가 복잡해서 이해하기 어렵다면 Layer를 추가하기 전에 constraint 자체를 단순하게 만드는 편이 먼저입니다.
자주 하는 실수

- Layer를 ViewGroup처럼 생각하고 child View를 안에 넣는 구조로 이해한다.
constraint_referenced_ids에 id를 빠뜨려 일부 View만 변형된다.- 원래 constraint가 틀렸는데 Layer 문제로 착각한다.
- scale 적용 후 주변 View와 겹치는지 확인하지 않는다.
- 단순 visibility 제어에도 Layer를 써서 의도를 흐린다.
- MotionLayout으로 다뤄야 할 복잡한 전환까지 Layer 한 개로 해결하려고 한다.
한 번에 정리
- ConstraintLayout Layer는 여러 참조 View에 transformation을 함께 적용하는 helper다.
- Layer는 ViewGroup 컨테이너가 아니라 ConstraintHelper다.
- 참조 View의 기본 위치는 각 View의 constraint가 먼저 결정한다.
- Layer 변형은 constraint가 만든 원래 배치 위에 적용되는 post-layout 효과로 이해한다.
- translation은 묶음을 이동시키고, rotation은 공통 중심 기준으로 회전시킨다.
- scale은 묶음 전체를 확대하거나 축소하지만 주변 겹침은 따로 확인해야 한다.
- visibility만 다룰 때는 Group이 더 적합하다.
Layer는 배치 컨테이너가 아니라, 이미 배치된 여러 View에 공통 변형을 더하는 helper입니다.
마무리
Layer를 잘 쓰려면 두 단계를 분리해서 생각해야 합니다. 먼저 각 View의 constraint로 원래 위치를 안정적으로 잡고, 그다음 Layer로 묶음 단위의 이동, 회전, 확대를 적용합니다.
공식 기준은 AndroidX Layer 레퍼런스, ConstraintHelper 레퍼런스, Android View 레퍼런스를 확인했습니다. 다음 17편에서는 ConstraintSet으로 XML에 있는 제약을 Kotlin 코드에서 바꾸는 흐름을 이어서 정리하겠습니다.
Android ConstraintLayout 완전 정리 이전 글 모음
Android ConstraintLayout 완전 정리 (1) – ConstraintLayout 기본 사용법: LinearLayout과 다른 제약 기반 배치 이해하기
Android ConstraintLayout 완전 정리 (3) – ConstraintLayout goneMargin과 margin 차이: View.GONE일 때 간격이 바뀌는 이유
Android ConstraintLayout 완전 정리 (5) – ConstraintLayout match_constraint 완전 정리: 0dp가 남은 공간을 채우는 원리
Android ConstraintLayout 완전 정리 (7) – ConstraintLayout baseline 정렬: TextView 글자 기준선을 맞추는 방법
Android ConstraintLayout 완전 정리 (8) – ConstraintLayout dimensionRatio 사용법: 1:1, 16:9 이미지 비율 맞추기
Android ConstraintLayout 완전 정리 (9) – ConstraintLayout percent min max 크기 정리: 화면 크기에 맞게 View 조절하기
Android ConstraintLayout 완전 정리 (10) – ConstraintLayout chain 사용법: spread, spread_inside, packed 차이
Android ConstraintLayout 완전 정리 (11) – ConstraintLayout chain weight와 bias: 같은 폭, 다른 비율 배치 만들기
Android ConstraintLayout 완전 정리 (12) – ConstraintLayout Guideline 사용법: percent 기준선으로 화면 나누기
Android ConstraintLayout 완전 정리 (13) – ConstraintLayout Barrier 사용법: 텍스트 길이에 따라 동적 기준선 만들기
Android ConstraintLayout 완전 정리 (14) – ConstraintLayout Group과 Placeholder: 여러 View 숨기기와 위치 바꾸기
Android ConstraintLayout 완전 정리 (15) – ConstraintLayout Flow 사용법: Chip과 태그를 자동 줄바꿈 배치하기


